
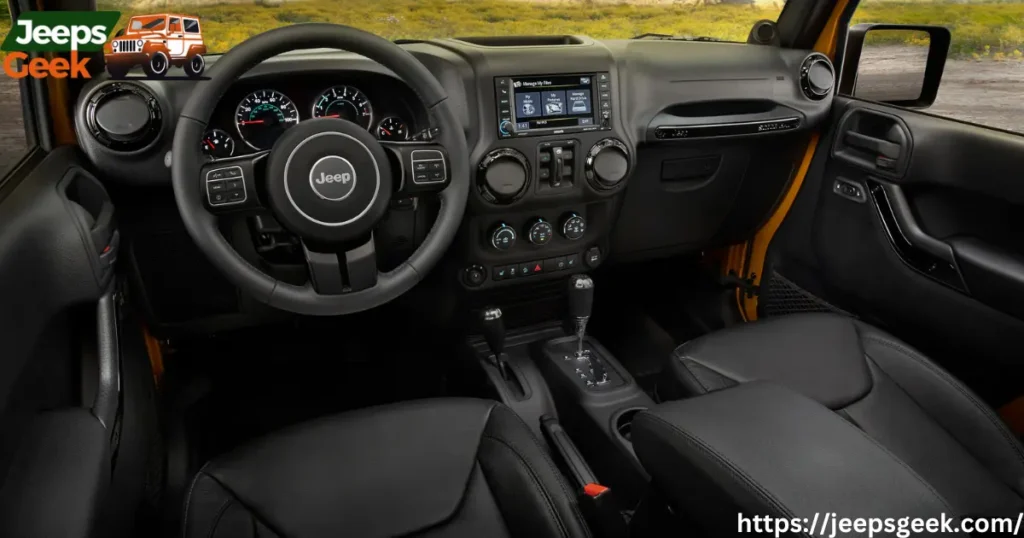
The Remote Proximity Keyless Entry system helps you get into your car more easily. When you lift the door handle, sensors notice the key in your pocket or purse and unlock the door. This works if your vehicle has this feature. But what if your Jeep doesn’t have it?
The good news is, yes, you can add remote proximity keyless entry to your Jeep. It’s not super easy, but it’s not too hard either. Just follow the steps below, and you can successfully add remote proximity keyless entry to your Jeep.
What Does a Jeep Remote Proximity Keyless Entry Do?
Your nearly perfect Jeep is only missing one thing, remote proximity keyless entry. With this feature, you can open your Jeep door by keeping a small key in your pocket. It’s that easy.
Your Jeep has a smart system that uses special technology to keep your car secure. Even when you’re not around, it knows where you are and makes sure the doors stay locked. When you come close, your Jeep senses a special key in your pocket and quickly unlocks. It does this by using low and high-speed signals to keep you and your Jeep connected.
Since it’s so easy to use, folks who don’t already have it often wonder, ‘Can I put remote keyless entry in my Jeep?
A jeep remote proximity keyless entry is like a magic key for your car. It lets you unlock and lock your Jeep without even touching the key. You just need to be close, and it works like a friendly robot opening the door for you. It’s super handy, especially when your hands are full.
But that’s not all. This clever keyless entry also helps you start your Jeep with just a push of a button. No need to fumble around for your keys; it’s like having a personal assistant for your car. So, with the jeep remote proximity keyless entry, driving becomes a breeze.
Which Jeeps Come with a Remote Proximity Keyless Entry?
In the newest Jeep models, you can only get a remote keyless entry system. But here’s the catch you need to specifically request it when you’re buying your Jeep. Older versions don’t come with this feature.
This means you can unlock and start your Jeep without physically inserting a key. It adds a touch of modern ease to your daily driving experience. Always check the specific trim and package details for each model, as features can vary.
Read also: What Is Headlight Illumination On Approach? Should you enable?
Can You Add Remote Proximity Keyless Entry to a Jeep?
You have the power to upgrade your Jeep with a proximity sensor kit for remote keyless entry. You can handle it on your own, and here’s how:
Open the door panel. Then, switch out the door handle and replace the harness. Check the wiring to make sure everything is connected correctly. After that, install the necessary software. We’ll go through the steps, safety measures, and tools needed to connect a remote keyless entry system to a Jeep.
Many Jeeps come equipped with a cool feature called remote proximity keyless entry. This means you can unlock and start your Jeep without even taking the key out of your pocket. It’s like magic for your car.
Jeeps like the Cherokee, Grand Cherokee, and Wrangler often have this handy feature. So, if you’re thinking about a new Jeep, check if it comes with remote proximity keyless entry for a convenient and futuristic driving experience.
How Can You Add Remote Proximity Keyless Entry to a Jeep?
First, you need a few things:
- 10mm socket (either deep or short)
- Extension pick
- T20 bit, T30, and a long T25
- Sharp-nosed pliers
- Masking tape
- Big and small non-line panel tool
- JSCAN app
You can purchase a remote keyless entry kit on Amazon or allmoparparts. With this kit, you can easily add remote keyless entry to your Jeep. They don’t clearly say, you can’t return items.
Steps to Follow:
1) Installation of Hardware
Remove the handle cap
- Remove the handle cap.
- When you open the door, you’ll see two stickers.
- Take off the upper sticker and insert a long Torx bit.
- Turn the screw bit counterclockwise to loosen the back handle cap.
- Remove the back cap completely.
2) Install the Handle and Cap:
- Slide the door handle towards the back; it will come off easily.
- Push the proximity kit handle into the slot where the old handle was.
- Secure the new handle in place.
3) Complete the Installation:
- Replace the cap over the installed handle.
- Tighten the cap to finish the installation.
4) Gently open the door panel.
- Find the interior handle and use a pick to open a small panel, exposing a T30 bolt.
- At the bottom and middle of the door, there are two T20 and two T30 bolts, respectively.
- Use a T20 and T30 bit socket to unscrew all of these bolts.
- Use a large online panel tool to carefully pop open the door panel.
- Be cautious while doing this to avoid any damage.
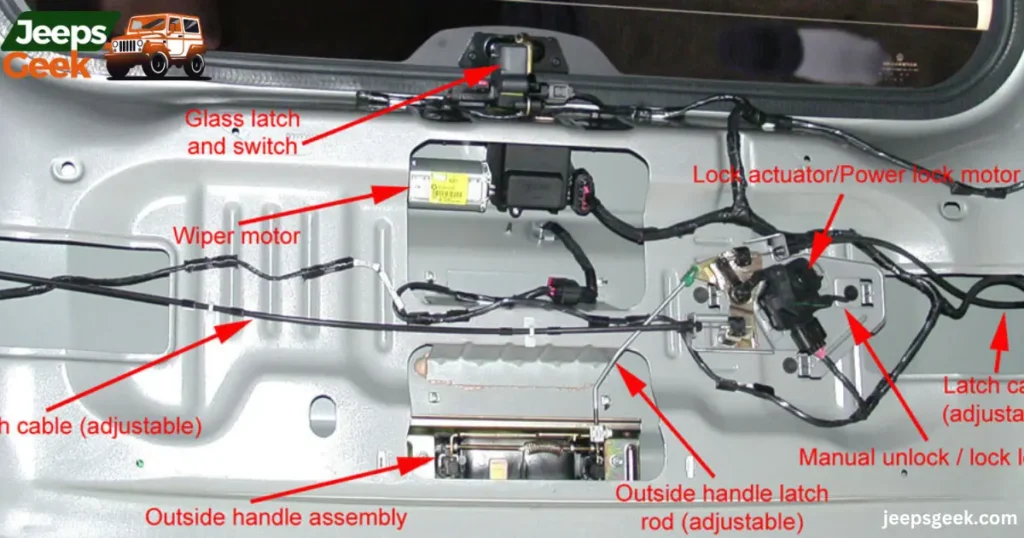
5) Open the door harness clip and lock cables by taking off the door panel.
- Once the door panel is a bit loose, slide it upward to fully open it; it’s held in place by the lock cables and door harness clip.
- Free the door harness by pulling on the rigged clip until it comes off.
- Slide and pull back one of the two lock cables to unlock it.
- For the other cable, use needle-nose pliers to squeeze the sides of the white collar. Keep squeezing while pulling the cable; a little pull will release the other cable.
- With everything unfastened, you can now remove the door panel.
6) Prepare the new harness.
- Take off the kicker panel like you would remove a door and detach the clips connected to the rear clips.
- Find the harness socket inside and pull it off the mount using the red tab.
- Slide off the old harness from the retainer.
- Put the replacement harness over the old one and re-insert the kicker.
- Use a t30 socket to unscrew the screws holding the old harness to the panel.
- Attach the new harness using the same screws.
- Tape the panel in place with masking tape and remove all door panel bolts.
- Remove the two rubber retainers from the panel.
- Roll the window down to expose the two 20 mm bolts and loosen them.
- Take out all the remaining bolts from the panel.
7) Disconnect all the wires from the panel and unplug the old harness.
- Find and remove the connector for the power mirror.
- Take off the old harness and begin working inside the panel, starting from the bottom.
- When you reach a rubber grommet, gently pull it a bit.
- Open the internal panel slightly to locate the end of the old harness.
- Follow the wire until it reaches the door lock; there, you’ll find a squeeze connector.
- Squeeze the connector to open the entire harness.
8) Reconnect the new harness.
- Open the old harness and reconnect all the points of the new harness.
- Remove the old harness from the rubber grommet and replace it with the new one.
- Connect the new harness to the panel socket of the old harness.
9) Reattach and Reconnect:
- Connect the power mirror.
- Use bolts to secure everything.
- Secure Bolts: Make sure all bolts are tight.
- Reconnect Cables:Put back the lock cables and harness clip.
- Reinstall Door Panel:Before putting the door panel back, reconnect the lock cables and harness clip.Place the door panel back in position.
- Secure Door:Use bolts to hold the door in place.
- Reverse Steps:Do everything in reverse to undo what you did.
10) Verify the wiring:

- Open the diagrams and start at the RF hub in the left quarter panel.
- Check that all the wiring for the handles is present in and out of the RF hub into the body harness.
- Move to the kick panel where the body harness meets the instrument panel harness.
- Note that connector XY315A on the body side has wires, but the IP side is empty.
- Identify driver’s side wires as 20 and 21, and passenger’s side as 25 and 26. See images for clarity.
2) Step Installation Of Software
For Software Installation we follow these steps
Getting Ready for Software Setup
- First, get the JScan App on your device. Make sure to also grab a Bluetooth adapter to link up with your Jeep’s computer. Check out the list of adapters that work with it.
- For the latest Jeep models, you’ll need an extra security bypass wire for the connection. Try the AUGOCOM FCA 12+8 universal adapter cable.
- If this is your first time doing this, watch the video for some guidance.
Note: You’ll need the newest version of JScan. And remember, to use JScan, you’ll need a license for your VIN, which costs about $23.”
Installing Software
Begin by connecting the OB2 Adapter, Security Bypass Cable, and Jeep Interface. Open JScan, find your vehicle, and link to the Bluetooth Adapter through the app. Once connected, look for these options:
#Dashboard #Modules #Adaptation
Firstly, go to Adaptation.
Then, select “Passive Entry Settings.”
Note: The latest app version now has Passive Entry as a separate option. It used to be in the Modules Configuration Tab. If you can’t find Passive Entry as a standalone option, “YOU CAN’T MAKE THE REQUIRED CHANGES.”
Adjust the settings in this sequence:
- Turn Passive Entry on or off, then select Active.
- For the left front, switch AP1 to Smart Switch.
- For the right front, set AP2 to Smart Switch.
- Switch AP3 to Smart Switch for the left rear.
- Set AP4 to Smart Switch for the right rear.
- Choose Smart Switch for the trunk in AP5.
Make sure your computer is set up to recognize that “Passive Entry Kit” has been added, and turn on the antennas to detect the key fob. The dealership calls this “GXD,” but we’ll take the careful approach and go step by step.
Now, go back to the previous tab and click on “Radio User Settings.” Then go to “Passive Entry On/Off” and switch it to “Active.”
Once you’ve done that, your system should be ready to go. Test it out by getting out of your Jeep and trying the Lock Button/Handle. Your key fob needs to be close to the door you’re using. You’ve successfully added remote keyless entry to your Jeep.
Adding Remote Keyless Entry to Your Jeep: A Simple Guide
Step 1: Gather the Right Tools
- Make sure you have the necessary tools like screwdrivers and pliers.
- Purchase a remote proximity keyless entry kit suitable for your Jeep model.
Step 2: Install with Care
- Remove the door panel carefully using a screwdriver.
- Unplug the existing wires and connect the new ones from the kit.
- Secure everything in place, ensuring a snug fit.
- Don’t forget to update the software for the new system.
- Double-check that nothing is left disconnected before completing the installation.
Jeep Wrangler Keyless Entry Not Working
If your Jeep Wrangler’s keyless entry isn’t working, don’t worry you’re not alone. Sometimes, simple things like a weak battery in your key fob or a blown fuse can cause this issue. Check your key fob battery first, and if it’s still not working, look into the fuse box to see if any fuses related to the keyless entry are blown.
If these quick fixes don’t do the trick, it might be a good idea to consult your Jeep’s manual or reach out to a professional for help. They can guide you through more troubleshooting steps or help you figure out if there’s a deeper issue that needs attention.
Remember, it’s often the small things that can cause keyless entry hiccups, and a bit of investigation can usually get you back on the road without a hitch.
Benefits Of Remote Proximity Keyless Entry
Adding remote proximity keyless entry to your Jeep can make your life a lot more convenient. With this upgrade, you won’t have to fumble for your keys, just approach your Jeep, and the doors unlock automatically. It’s like having a helpful assistant making your entry smoother.
Plus, it adds a modern touch to your vehicle, making it feel more up to date with the latest technology. The process may require some care, but once it’s done, you’ll enjoy the ease of unlocking and starting your Jeep without digging through your pockets for keys.
Pros And Cons
| Pros | Cons |
| Convenient entry without key fumbling | Installation may require technical knowledge |
| Modernizes the vehicle | Cost of the keyless entry system and installation |
| Enhanced security features | Possibility of electronic malfunctions |
| Improved resale value | Reliance on battery-powered key fob |
| Easy access in various situations | Potential for unauthorized access if not secured |
Future Scope
In the future, adding remote proximity keyless entry to a Jeep is likely to become even more accessible and user-friendly. Advancements in technology may lead to simpler installation processes, making it easier for Jeep owners to enjoy this convenient feature.
Manufacturers might develop more user-friendly kits, and instructional resources could become even clearer, allowing more people to customize their Jeeps with remote keyless entry.
As technology continues to evolve, the prospect of enhancing your Jeep’s features could become a straightforward and enjoyable task for even more enthusiasts.
Answers To Key Questions
What is the difference between keyless entry and proximity entry?
Keyless entry involves using a remote or keypad to unlock doors and start the car.
Proximity entry typically relies on a key fob that automatically unlocks the car when in close proximity, offering a more hands-free experience.
What is a proximity key for a Jeep?
Proximity key for a Jeep is a key fob that allows you to unlock and start your Jeep by being in close proximity to the vehicle, providing a convenient and secure way to access and operate your car.
What is a passive entry on my Jeep?
Passive entry on your Jeep means the ability to unlock and start the vehicle without actively pressing any buttons on the key fob. As long as the key fob is in your pocket or bag, the Jeep senses it and allows you to enter and start the car effortlessly.
What is the difference between keyless entry and passive keyless entry?
Keyless entry usually involves pressing buttons on a remote or keypad to unlock and start the car.
Passive keyless entry enables hands-free access; the car senses the key fob’s proximity, allowing you to unlock and start the vehicle without manually pressing any buttons.
Final Words
Could you install remote keyless entry in a Jeep? I believe you can. Adding remote keyless entry to a Jeep is not too hard, especially if you have the right tools and skills. It’s important to be cautious. If you’re not sure about the process, it’s better not to attempt it. Don’t worry, but be aware of your limitations.
First, take off the door panel, unplug the wires, and put in the new ones. Make sure everything is secure, and you’re finished. After that, update your software. Just make sure nothing is left unplugged while you do it.
Adding remote proximity keyless entry to your Jeep is a doable DIY project. With the right tools and a compatible kit, the process becomes straightforward. Start by gathering essential tools like screwdrivers and pliers, then acquire a kit designed for your Jeep model. Carefully remove the door panel, disconnect old wires, and replace them with those from the kit.
Ensure a secure fit and don’t forget to update the software. It’s a practical upgrade that brings convenience to your Jeep experience. Just remember to follow the steps diligently, and soon you’ll be enjoying the benefits of remote keyless entry in your Jeep.

I’m Dariel Campbell, your companion at “Jeeps Geek.” Whether you’re tackling challenging terrains or dealing with Jeep intricacies, I’m here to assist. Let’s navigate the Jeep universe together, resolving issues and celebrating the spirit of off-road exploration.